
Most 4-channel car amps are designed with the bridge mode feature. This means that you can combine the four channels into one channel to increase the power output. This is called car amp bridging.
While car amp bridging drives much more power to your subwoofer/speaker, you need to know that each amp is different. Some amps are unbridgeable while some amps, when bridged, aren’t capable of driving a subwoofer/speaker with an impedance that’s less than 4 ohms.
To stay safe when bridging your 4-channel amp, make sure that you’re using a bridgeable amp and carefully follow the instructions.
In this post, I will show you how to bridge a 4-channel amp into a single channel to maximize the power output.
Note: You mustn’t bridge an unbridgeable amp, it’s dangerous. Also, some amps are already bridged internally, bridging them again externally will only cause harm. Therefore, I recommend that you check your amp’s specifications before the bridging process.
Materials You’ll Need
You’ll need the following materials before you begin the bridging process:
- 4-channel amp
- Owner’s manual
- Screwdriver
- Speaker wires
- Wire stripper
These materials are important to achieve success in your car amp bridging.
Bridging Your 4-Channel Amp to Two Subwoofer/Speaker Step by Step
Here is a step-by-step guide on how to bridge a 4-channel amp:
Step 1: Ensure that Your Amp is Bridgeable
The first step you should take is to establish that your amp is bridgeable. Pick up the owner’s manual and carefully read through it to understand the connection process. The manual will also help you to understand if your 4-channel amp is bridgeable or not.
You should also see in the manual if your amp is capable of driving a subwoofer/speaker with an impedance lower than 4 ohms to prevent overheating.
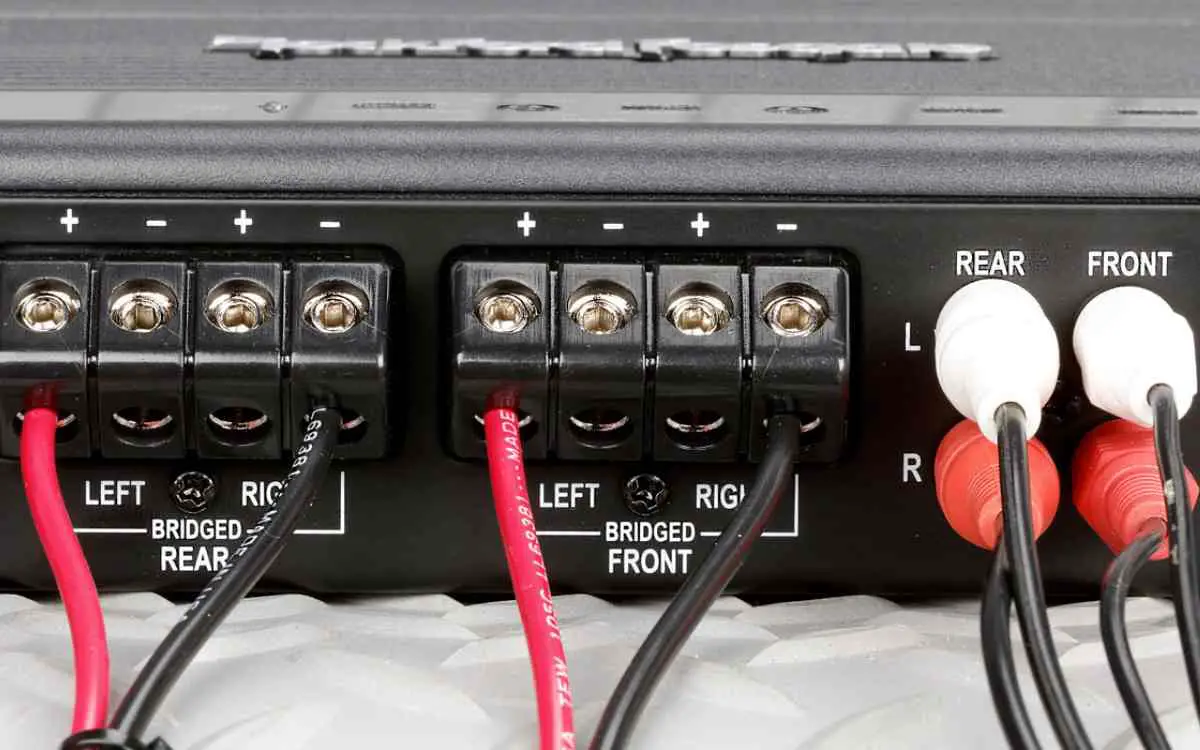
Step 2: Identify the Terminals on The Amplifier
Turn to the back of your amp and identify all the terminals on it. If you truly have a 4-channel amp, you should see eight terminals on it – a positive terminal and a negative terminal for each channel.
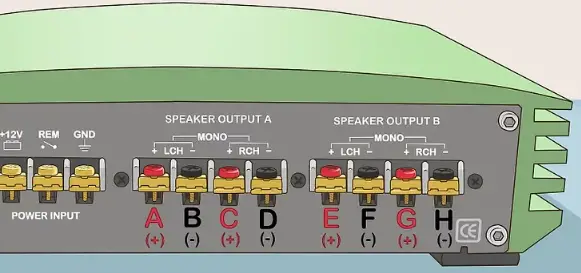
To help you better understand the remaining step, I’ll mark the four channels as 1, 2, 3, and 4. I’ll also label the terminals as follows:
- Channel 1 – A for the positive terminal and B for the negative terminal.
- Channel 2 – C for the positive terminal and D for the negative terminal.
- Channel 3 – E for the positive terminal and F for the negative terminal.
- Channel 4 – G for the positive terminal and H for the negative terminal.
On most bridgeable amps, you should see channels 1 and 2 grouped as ‘speaker output A’ and channels 3 and 4 as ‘speaker output B.’ There may also be a sign that you can bridge each output into mono. On other amps, the first 2 channels may be labeled ‘front channels’ while the last 2 channels are labeled ‘rear channels.’
Step 3: Connect the Subwoofer/Speaker to the Amp
For this step, you can either use the speaker wires or RCA cables depending on what you have on your amp and subwoofer/speaker. If both the amp and subwoofer/speaker have the RCA ports, then you should use the RCA cables. If both of them have a screw-down clamping system, then you should use the speaker wire.
But if the amp and subwoofer/speaker have differing connection systems, then use the Line-out converter for the connection. Whether you’re using the speaker wires, RCA cables, or line-out converter, connecting the subwoofer/speaker to the amp follows the same procedure.
Run an RCA or speaker wire from A on the amp to the positive terminal of the subwoofer/speaker. Carefully plug the RCA cable(s) into the terminal(s).
You may have to use a wire stripper to peel off about a half inch of insulation from both ends of the speaker wire. After that, use a screwdriver to securely clamp down the speaker wire in the terminal(s).
Next, run another RCA or speaker wire from D on the amp to the negative terminal of the subwoofer/speaker. Double-check the screws to ensure that they are properly tightened and that there are no loose wires.
At this point, the bridging process of adding a single subwoofer/speaker is now complete. You can go on to test your system. If available, don’t forget to set the switch marked “Stereo, Mono, or Bridged” to Bridged.
Step 4: Connect Another Subwoofer/Speaker to the Amp
If you have a second subwoofer/speaker, connecting it to the amp is as simple and easy as the procedures in step 3. This time around, you’ll use speaker output B.
Run an RCA or speaker wire from E on the amp to the positive terminal of the second subwoofer/speaker. If you’re using the RCA cable(s), plug it carefully into the terminal(s). Next, run another RCA or speaker wire from H on the amp to the negative terminal of the second subwoofer/speaker.
Bridging Your 4-Channel Amp to One Subwoofer
You can easily bridge your 4-channel amp to work with two speakers, two subwoofers, or two speakers and a subwoofer. But bridging your 4-channel amp to just one sub is a bit difficult. This, however, doesn’t mean that it’s not possible.
You can make it happen if you’re connecting a dual-voice coil subwoofer. It’s also possible if you can bridge two channels with a coil each. Nevertheless, it isn’t worth going through all the stress. I’ll recommend that you just bridge two outputs to the one subwoofer and leave the other two channels.
Conclusion
If you’ve ever added a subwoofer to your factory stereo using an amp, then bridging a 4-channel amp shouldn’t be something tasking. But in case you haven’t done it before, you can follow the guide above on how to bridge a 4-channel amp.
Car amp bridging is an effective way to double your amplifier output, which, in turn, drives more power to your subwoofer/speaker and boosts your bass.
If your amp is bridgeable, it’s not a bad idea to give amp bridging a try. Otherwise, don’t make any attempt to bridge your amp. If you do, you’ll cause your amp to overheat and get damaged.
Frequently Asked Questions
Q: Can I bridge a 2-channel amp?
Yes, you can bridge a 2-channel amp in order to double the output and power your subwoofer/speaker. However, you should make sure that the amp is bridgeable before attempting to bridge it.
Q: Is it safe to bridge an amplifier?
Yes, bridging an amplifier is perfectly safe as long as the amp is capable of being bridged and you follow the instructions for bridging properly. Make sure that your amp does not overheat or get damaged in any way during the process.
Q: What is the advantage of bridging an amplifier?
The main advantage of bridging an amplifier is that it doubles the output and power for your subwoofer/speaker.
This, in turn, helps to improve sound quality and increase bass. It also allows you to use a smaller amp compared to one with similar wattage but without being bridged.
Q: How do I know if my amplifier is bridgeable?
Most amplifiers will have a switch marked “Stereo, Mono, or Bridged”. If your amp has this switch, then it is bridgeable. You can also check the owner’s manual for more information on bridging capabilities.
In case you don’t have the user manual, a quick internet search including the model number should suffice.
Q: Is there any downside to bridging an amplifier?
The main disadvantage of bridging an amplifier is that it reduces its output wattage per channel. It also increases the demand placed on the amp, which can cause overheating and other issues over time if not monitored properly.
Additionally, bridging an amp can cause sound distortion or clipping at high volumes. It is therefore important to be aware of your amp’s capabilities and limitations before attempting to bridge it.
Q: What happens if I bridge a non-bridgeable amp?
Bridging a non-bridgeable amp will not double its output wattage; instead, it can cause significant damage to both the amp and the speaker/subwoofer connected to it.
Do not attempt to bridge an amplifier that is not marked as being bridgeable. If you do so, your warranty may become void and you could end up with costly repairs on your hands.
Therefore, it is always best practice to check with the manufacturer or refer to the owner’s manual before attempting to bridge an amplifier.