
It’s a dilemma that plagues many car owners – what do you do when your subwoofer stops working? If you’re not sure how to fix it, don’t worry – we’re here to help.
In this article, we’ll walk you through the steps for fixing a blown subwoofer.
Step-by-Step Guide on Fixing a Blown Subwoofer
Don’t panic about your blown subwoofer, listed below are simple and surefire steps to fix and restore your blown subwoofer.
Step 1: Discover the Actual Part That is Damaged
Your subwoofer can get blown due to several different reasons. But to fix the blown subwoofer, you need to diagnose the actual part that is damaged.
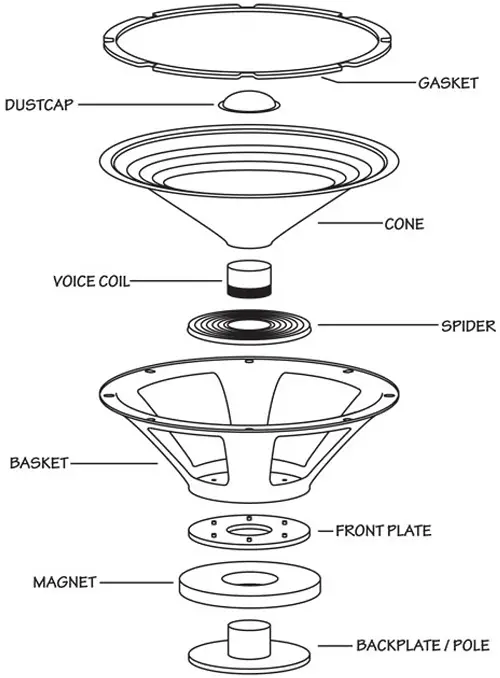
To do this, gently take off the cover for your subwoofer and examine each of the internal components. If your subwoofer produces distorted audio, the voice coil is likely the problem.
But to ascertain that the voice coil is faulty, check the terminals of the coil with a multimeter. If the multimeter gives any reading, the voice coil doesn’t have a problem as it still shows resistance. Otherwise, the voice coil is indeed faulty.
If the voice coil isn’t faulty, then check the speaker cone, it’s likely there might be an issue with the speaker cone. Gently push along the sides of the cone and note the movement. Normally, the speaker cone should move in and bounce out easily.
But if the cone is rigid and doesn’t move, then the cone is faulty – broken, torn, or jammed. Carefully examine the speaker cone for small holes or rips. Sometimes, the voice coil may be stuck in the speaker cone.
Step 2: Get the Necessary Tools to Fix the Blown Subwoofer
Either you need to fix the voice coil or the speaker cone, you’ll need the following tools:
- Screwdriver
- Soldering iron
- Sharp knife
- Glue
- Compressed air blower
- New voice coil and spider (if the voice coil is faulty)
- Microfiber Cloth
- Cone replacement kit (if the speaker cone is faulty)
Once you’ve gotten the items above, proceed to the next steps.
Step 3: Take the Frame Apart to Expose the Speaker
Now that you’ve ascertained that the problem is either with the voice coil or the speaker cone, you need to uncouple the frame (casing) to access the speaker.
Using a screwdriver, loosen the screws holding the frame together and also loosen the bolts holding the speaker on the frame. Carefully study how the wires are connected – if possible, take a photograph of the wiring.
After that, carefully detach the wires considering that you already know where each wire is connected for easy re-connection after repairing the speaker. You should also keep the screws and/or bolts in a safe place to avoid misplacing any of them.
Step 4: Separate the Speaker from the Surround
Now you need to separate the speaker from the surround. To do this, use a sharp knife to remove the glue that is holding the surround. As you push the sharp knife through the edges of the surround, do this carefully and not quickly as the edges can get damaged or punctured easily.
Step 5: Take Out the Voice Coil and Speaker Cone
Now, it’s time to take out the speaker cone, spider, and voice coil in that order. Use a sharp knife to slowly take out these components from the basket. When removing the speaker cone, spider, and voice coil, handle them gently and with care.
You should see terminal wires on the voice coil, detach them slowly and carefully when you need to remove the voice coil.
Step 6: Replace the Faulty Parts
You’ve taken out the two likely parts with the problem – the voice coil and the speaker cone. Here is how to fix either of these components. Don’t forget to put on a pair of gloves for your safety.
Fixing A Faulty Voice Coil
The voice coil is usually the most important part of the speaker and should be prioritized. Here are the likely problems with the voice coil and how to fix them.
Misadjusted or Stuck Voice Coil
Most of the time, the problem is that the voice coil is out of place or stuck and should be properly readjusted. During step 5, look at the voice coil to see if it’s only pushed up and out of place and if its wires are still good.
If this is the situation, you don’t need to purchase a new coil. What you need to do is gently readjust the coil back into its position without damaging anything. You can also press the speaker to allow the coil to automatically adjust itself back into its place.
After that, test the speaker to see if it works fine. If yes, recouple the subwoofer. Otherwise, the coil is damaged and needs a replacement.
Bad Wires
If after taking out the voice coil, you noticed that the wires are bad, then you need to get a new voice coil to replace the damaged one. Take out the damaged coil and check inside its slot for dirt, dust, and/or debris. Using an air compressor, clean the slot in preparation for the new coil.
After that, gently insert the new voice coil inside its slot and carefully reconnect its wire using a soldering iron. Glue a fresh spider around the new voice coil. Then, insert the speaker cone into its position – the center of the new voice coil.
Add some glue to the edges of the speaker cone to hold it in its position. Leave the speaker to rest for about 24 hours to allow the glue on the speaker cone to fully dry.
Fixing A Faulty Speaker Cone
The speaker cone can either be torn or severely damaged. Either of these situations can lead to a blown subwoofer.
Repair the Tear
If you notice a tear in the speaker cone, you can apply a simple fix to the tear. But this fix is only a temporary solution and not a perfect fix. To fix the torn speaker cone, you need a patch or some paper towels and a strong adhesive.
Cut some patch or paper towel wide enough to fit the size of the tear only. Add just enough adhesive all over the surface of the patch or the paper towel to moisten it. Now, gently place the patch or moist paper towel over the cone so that it completely covers up the tear.
Press and smoothen the patch or moist paper towel into the speaker cone gently using any suitable tool. You need to repeat the same process for the other side of the speaker cone. Once you’re done, leave the cone for some time to fully dry.
If possible, apply black matte paint over the glued paper towel to make it sturdier.
Replace the Speaker Cone
If there are multiple tears on the cone or if the cone is severely damaged, you need to replace it with a new speaker cone.
Take out the damaged speaker cone and clean the area where the new cone will sit with a microfiber cloth to get rid of dirt and dust. You can also use an air compressor if you have access to one. You should also remove any rough surface on the edges of the frame where the old cone was using a sharp knife.
Apply some glue on the edges of the new cone and install it where the old speaker cone was. Make sure that it seats properly. Also, secure the dust cap and upper plate (gasket) on the cone using some glue.
Wait for about 24 hours to allow the glue to fully dry before moving on to the next step.
Step 7: Replace the Surround
Now that you’ve fixed the damaged parts, you can then replace the surround. I’ll advise that you get a new surround and not use the old one.
Apply some glue around the edges of the new surround and place the surround carefully on the speaker’s frame so that it accurately covers the ends of the speaker cone. Once again, leave it for about 24 hours to allow the glue to dry fully.
Step 8: Recouple the Frame
The next step you have to do is to put the speaker back into the subwoofer frame. Using a screwdriver, tighten the screws/bolts holding the speaker in the enclosure. After that, reconnect the wires you detached in step 3 back to the terminals – make sure that you match the connections rightly.
Now tighten the screws holding the subwoofer frames together to conceal the speaker in the enclosure.
Step 9: Reconnect the Subwoofer
The last step requires you to reconnect the subwoofer to your sound system and test it to see if the sound is fixed.
If all the steps above are rightly followed, your blown subwoofer should now be working perfectly and you can listen to your favorite music from your subwoofer. Otherwise, you’ll have to consult a sound professional to fix your blown subwoofer.
Will the Original Sound Quality be Restored After I Fix a Blown Subwoofer?
Fixing a blown subwoofer will restore the original sound quality of your subwoofer, but it may not be as perfect as it used to be. This is because some parts of the subwoofer have been replaced or repaired during the process of fixing the blown subwoofer and this might affect its performance.
However, you should be able to enjoy the performance unless you are extremely sensitive to sound quality.
In some cases, you may need to install a new subwoofer if the damage is beyond repair. This will be more expensive but it will also ensure that you have the top-notch sound quality from your subwoofer.
Why Does Subwoofer Blow Out?
There are several reasons why your subwoofer can blow out. Some of these include:
Overheating:
Subwoofers contain a lot of electrical components and when they get too hot, it can cause them to fail. To prevent this, ensure that you don’t overload the subwoofer with too much power or amplify the sound too much.
Defective Wiring:
If the wiring of your subwoofer is faulty, it can cause it to blow out. To prevent this, make sure that all the wires and connections are properly secured and that there’s no sign of fraying or corrosion.
Poor Quality Component:
Subwoofers consist of several components like speakers, cones etc., and if these aren’t of good quality, they can fail easily. Make sure you get a subwoofer with high-quality parts from a trusted manufacturer.
Physical Damage:
Dropping or bumping your subwoofer can damage its internal components and cause it to blow out as well. Therefore, you must handle your subwoofer with care to avoid any physical damage.
Conclusion
Fixing a blown subwoofer may not be an easy task, but with the right instructions and tools, you can do it. The steps listed above are all that is required to fix your blown subwoofer.
You need to follow them patiently and carefully to get the job done like a pro. If you find any of these steps too difficult to understand or perform, you can always consult a sound professional for help. Good luck!